Saturday, May 28, 2011

pretty & super fast crafty goodness.


How easy is it to make a card? SUPER EASY. I am a firm believer that easy cards are often the prettiest. Probably because I am a fan of the clean & simple look. Or maybe because it is the simplicity itself that I find attractive. It could be that I have fallen in love with the letterpress look with it's white space and bold colors. Whatever the reasons are...I love this card if I do say so myself.


A little leafy green, some bright sunny yellow, a deep blue and voila! Prettiness!


I added some pearls, but only a few, to add a little diamension to it. Thought about adding lots of other things and then just told myself to stop.


Knowing when to stop is half of design.


The whole thing took less than 5 minutes! I am going to be playing with this look a LOT more in the days to come.


This is a stamp set everyone should have. It is so easy to use, gives you BEA-U-T-ful results every time and can be used with almost every occasion.


Check out Beautiful Botanicals and Beautiful Botanicals 2 at www.amusestudio.com/larakalapacs

Friday, May 27, 2011

little gifties!

One of my favorite things to do is to give little gifts to people! I love to drop them in their bag or purse without them noticing to find later. A little surprise to brighten their day.

I had a ton of fun making these cute little twisted boxes. They are big enough to fit a few Lindt Truffles or 6 Hershey Kisses or really any tiny gift. I like that they are well sealed, especially if you are filling it with a little trinket like a pair of earrings or a charm for a bracelet.

I used super stick tape to give it a good seal and I scored it to give the ends a crimped look and to ensure that the tape sealed very well.

They'd make great favors for a party or wedding!


The tag needed just a little something so I added some polka dots with my copic. I love how it brings the ribbon and the blue together.


They were so fun to make that I had to try it again in a different color palette. I am going to have to remember this next Easter. I think I could make an awfully cute carrot box out of this!

The white flowers are stamped in sugar ink and then embossed in sugar embossing powder so they really stand out on the orange.

The color combos are endless....I have a feeling you'll be seeing more of these posted here. I LOVE this little box so much!

Thursday, May 26, 2011

guitars & glitter!

There was a Moxie Fab World challenge a few weeks ago and this card would have been perfect for it. I made it and was about to post it when I saw that one of my favorite Stampers, Julie Ebersole made a card that looked a lot like it (see her blog http://www.papertrufflez.typepad.com/ and look for the April 27 post), and had just posted it. Maybe great minds think alike or maybe I got lucky. Either way, I didn't post it in the challenge because it felt like I was coping, and although I do borrow (and give credit) from other stampers it just didn't seem to feel right for a challenge. Anywho, here is my card. I liked making the double polka dots. It's hard to see in the pics, but the kraft dots were run through my Big Shot and debossed with the mini polka dot impression plate.

I think it ended up being a fun "boy" card and that can be a hard thing to do.


After making the boy guitar card I found myself teaching a class for teenage girls. I had no idea what to design for them and when I asked for some advice on color I was told black and purple. It took me a while but I finally came up with this card. I recycled an old layout (that I got from Julie E. gee she has been helpful lately...may need to start making some thank you cards!) and changed the stamps and colors and what do you know....a whole new look!


Even though I do feel 15 years old when I look at this card I kinda like it!

I'll give you 3 guesses as to my favorite part of this card, but really it shouldn't take more than one!


YES it is the glitter! However did you know? I love the little sparkle that it adds. That is what the girls liked best too! Sometimes I wonder how I ever did anything without a Quickie Glue Pen & A Muse Studio Diamond Glitter. It is just the prettiest, sparkliest, yummiest glitter that I have ever used! I LOVE this glitter!


If you like the look of it and decided that you just have to have some too, let me know. I am happy to place an order for you or you can place one yourself here at www.amusestudio.com/larakalapacs.


Tuesday, May 24, 2011

a challenge.


It's Tuesday Trigger time over at Moxie Fab World and once again I am playing along. This lovely stack of pyrex bowls is the trigger picture and I have to say that it has been a big inspiration. I have more ideas the longer I look at it. It helps that it is in a color palette that is dee-lish to me! And as it has been feeling more like fall than spring around here I am seriously thinking about baking some pumpkin chocolate chip cookies as soon as I finish posting this.


If you want to play along too (try it, you'll like it!) then follow this link over and get inky with me!


http://www.moxiefabworld.com/2011/05/tuesday-trigger-pyrex-effect.html


This is what I made today:


The pyrex got me thinking about my grandmother (those are her green pyrex bowls in the picture). I have so many fond memories of her, but sometimes I miss being able to make new memories with her.

The inspiration for my card was very much from the picture....the colors and the style. I had fun paper piecing the bottom of the card to look a little like the tablecloth in the picture. I have also been enchanted with the stamped letterpress look lately. Until recently I was not a very big fan of solid image stamps. It seems to be something that I am reaching for more and more! It's lots of fun. Also, I am liking how the paper piecing came out. Not something I would do to make a ton of invitations or something, but I find the optical illusion of the pattern to add a little something to it. What do you think?


I love how bright and cheerful letterpress can look. So simple. So colorful. No clutter. And it's easy peasey lemon squeezey! What's not to love?


Card Recipe (all products by A Muse Studio): Stamp sets- just because; Cardstock- sugar, french roast, cherry, buttercup, orange; Ink- papaya, cranberry; Accessories- corner chomper

Monday, May 23, 2011

...true love.


This little card is to say "Happy Anniversary" to one of my favorite couples. Scott & Ann, I love you both so much and I am so thankful for the wonderful example of true love that you live out every day. Life is not a fairy tale and it is not easy, but you are a shining example for anyone who doubts that true love, forever love, is real. God bless you both!


The idea for this card was inspired by Scott & Ann's wedding. I helped (and am still helping...) Ann make a quilt with a tree on it that was the guest book for their wedding. Each guest signed a leaf that was then put in the tree. I stitched their intials and the date into a heart and appliqued it to the tree trunk (actually I think I still need to do the applique part...Ann let's finish it soon! sorry!).


The idea came to me the other day while I was thinking of other ideas for recessed window cards. The base is kraft cardstock and the piece of french roast was embossed with the woodgrain pattern and then sanded to show the bark. Then I cut a hole in the bark and mounted the bark onto the card base.


I couldn't resist continuing the theme on the inside, especially since in echos the guest book/quilt so well with the heart carved into the trunk.

Happy Anniversary! I love you!


Card Recipe (All products are from A Muse Studio): Stamp Sets-Essential Sentiments, Love Conquers All; Paper-Kraft, French Roast, Sky; Ink-French Roast; Accessories-Copics E31, E55, E57, Stitched Grosgrain Ribbon in Sky, 3D tape, Woodgrain embossing plate, Vintage Labels die.

Wednesday, May 18, 2011

...a challenge


It's moxie fab time again, and I so love this week's Tuesday Trigger. Isn't it cute? You can play along at http://www.moxiefabworld.com/2011/05/tuesday-trigger-some-royal-fun.html


I love the plate, the pink curly-Q cakes, and I love the little "let them eat..." cupcake flags. I know that it is in honor of the recent royal wedding, but the flags, of course, started me thinking about the oft misatttibuted quote:

"Let them eat cake!"
And once my inpiration leads me in the direction of anything French I find my Eiffel Tower stamp in one hand and glitter in the other....did you know that the Tower sparkles? It really does! I didn't think I could love it more and then I saw it sparkle. Love love love it!

As a result, I couldn't help but make this card!


I wanted my card base to reflect the two-tone pink icing. I decided to stamp the Eiffel Tower on sky blue cardstock to pick up the color in the plate. I added the little cake and colored it in with my copics. Since I didn't have a sentiment that I was looking for I just wrote it in with my copic multi-liner--problem solved!


A close up pic shows off the glitter on the icing. Hope you like it and that you play along!


"Qu'ils mangent de la brioche!"


Card Recipe: All products are A Muse Studio--Stamp Sets: Ooh la la!, Oven Joy Harlequin Background; Paper:blush, sugar, and sky; Ink: bubblegum, Memento tuxedo black; Accessories: onyx twine, quickie glue pen, diamond glitter, copics-multi liner, BG10, B21, RV13, R20, R29, 3D tape.


Thursday, May 12, 2011

...chocolate.

I was so inspired by the video. I was bold enough to say that I was going to post what I made...before I had any idea what I was going to make exactly. And then, I got a little stuck. Finally, I came up with something. I don't think it's quite done. It needs a little something at the top, but I'm not sure what. I loved doing the window! I am going to have to keep this idea in mind and see what else I can come up with .


I love this little chocolate! The red heart twinkle sticker fits perfectly on tip to give it a little sparkle. And the sentiment makes me smile.

Card Recipe: All Products by A Muse Studio--Stamp Sets-Love Conquers All, Hearts a'Plenty; Paper-cherry, kraft; Ink-french roast, cranberry; Accessories- 1"square punch, clear embossing powder, red heart twinkle, 3D tape


Wednesday, May 11, 2011

new techniques!

Check out this video and learn how to make a recessed window card. It's easy-peasey-lemon-squeezey! And step by step visual instructions make it even better!

http://www.youtube.com/watch?v=aTNg6iZpw3s

I'm going to be making something using this technique tonight and will post pics of what I come up with.

Monday, May 2, 2011

...the beach


I was in the mood to enjoy some crafty-goodness the other day, but I could not make a single thing. I had no ideas. NONE! So I was poking around online and I remembered a card that I saw and loved. Sometimes, even when you have no ideas of your own, you just HAVE to make some thing. So I copied a card from a very talented designer, Julie Ebersole. You can see her original card here:


and you can read Julie's own blog here:


If you ever find yourself in need of some creative juice, ideas or inspiration....Julie and her blog is a very good place to swing on by! Seriously beautiful and amazing stuff! Julie--I so hope that you don't mind a little shout out....or copycatting! :)


Anywhoo! So this is what I flat out copied from Julie! All the credit goes to her!


I had to make a few changes....I didn't have any craft sand hanging out in my closet just waiting to get used so I ran a piece of toffee paper through my Big Shot with the A Muse Studio tiny polka dot impression plate, sanded the dots to reveal the white core paper hiding just under the pretty toffee color and voila! sand...paper sand! I used a darker blue for my card base, again, that's what I had... I am a HUGE fan of using what ya got! Make it work! :)


This is what I really learned from making this card...coping Julie's technique-white embossing powder is amazing and a little bit of copic makes a big difference!


I love the white embossing powder on the buttercup paper! I love the highlight of the copic and how it adds depth and detail to my little starfish! This is something that I am sure I will be doing again. Note to self (and anyone who's listening): Copics are not just for elaborate coloring on white paper! They can do so much more and this starfish is a great example of that.


Hmmm, now I 've got summer on the brain.... let's see what else I can make....


Don't you just love how sometimes all you have to do is START the crafty-goodness and then it just keeps right on coming...I'm off to see where it leads me. Have an a*musing day!


card recipe: Cardstock-ocean, sugar, toffee; Ink-latte, sky, sugar; Stamp Sets-seashells, contemporary greetings; Accessories-twine in vanilla, polka dot impression plate, sugar embossing powder, 3D tape, Y17 copic (all products are from A Muse Studio)

Monday, April 25, 2011

...maple sugaring & thank yous

Here in New England when the weather starts to warm a magical thing happens. But you have to know where to look. It is hidden inside the sugar maple trees. When the days start to warm but the nights are still dipping below freezing, the sweetwater sap starts to flow in the tree. And if you know how you can draw the sap from the tree and make the most de-lish maple syrup! And that is exactly what we learned how to do....


First tap the tree.


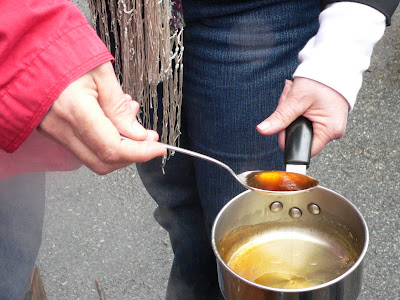
and then collect the sap. It looks like water and at this point only has the slightest maple flavor to it. The sap gets collected in buckets and then the real work begins.


The sap gets cooked down for hours. It takes 40-50 gallons of sweetwater sap to make one single gallon of maple syrup. The sap reduces and must be watched carefully so that it doesn't burn. But I have to tell you that the amazing aroma at this point is beyond my writing ability to describe. It is almost as satisfying as the taste of the liquid amber...almost.


The final product is so delectable! It is not even comparable to the "pancake syrups." It is even better than those jugs of real maple syrup. It is one of the most absolutely DEE-LISH things that I have ever tasted in my whole life!


Isn't it pretty?!


So, I had to thank our friends, Joe & Elaine, for showing us this hidden treasure. And for sharing their sweet syrup with us.


Which led me to make up this card. I wanted to send a thank you to them and knew exactly what I wanted to make. I started with the base, using a woodgrain impression plate to give a nice woody texture to the dark brown card front. Then I stamped and die cut a label and added my sentiment. For the final element, I stamped the tree and embossed it, trimed it out and popped it up.


Makes a sweet thank you don't you think?


card recipe:(ALL ingredients by a muse studio) Stamps-vintage labels, love conquers all, contemporary greetings; cardstock-kraft, french roast, sage; Ink-french roast, sugar;Embellishments-woodgrain impression plate, vintage label dies, sugar embossing powder, 3D tape

Wednesday, April 20, 2011

to celebrate birthdays!

One of my very favorite things to do is throw a party so I was thrilled when my friend Ann's husband asked me to help him surprise his wife for her birthday. I love the little detail involved in throwing a party. I especially love to make party favors! Though many have tried to convince me otherwise I simple don't believe that favors are meant only for children. Who doesn't love a tiny something that says in its diminutive way, "Thank you for coming and celebrating with me. I appreciate you." So, this is what I cooked up for my sweet friend Ann.


Cutie-patootie chocolate boxes. They were super easy to make and who doesn't want a little bite of chocolate? Here is a link to direction to make your own chocolate boxes:
http://www.splitcoaststampers.com/resources/tutorials/ghirardellibox/

Also, this is the cake we had. If you are ever in Hampton be sure to make your way to the Galley Hatch and ask for the Rosebud Cake. You will not be sorry! I am still dreaming of it....


Have an a*musing day!

Saturday, April 2, 2011

a challenge.

I find myself completely unable to resist playing along with the Moxie Fab World Tueday Trigger. If you want to play along visit the Moxie Fab blog here: http://www.moxiefabworld.com/2011/03/tuesday-trigger-farm-fresh.html I am so in love with the colors of this weeks Trigger pic:


I love all of the white space! I love the orange and blue! I love the simplicity of it! I had no ideas at first because I was determined to use only what I have on hand. So I started pulling things out and then THIS happened:

I love the white space! I love the orange and blue! I love the simplicity! Here's a close up for good measure... Isn't it cute? I think it is if I do say so myself. I love it when my crafty time is productive. Let me know if you are playing along this week. I'd love to see what you made!

Orange ya'Blue Birthday Wishes Card Recipe: Stamps-contemporary greetings; Ink-ocean; Paper-sugar, sky, bermuda, orange, orange gingham; Embellishments- bermuda button, a random bit of twine I found in the bottom of a drawer.

Wednesday, March 30, 2011

crafty spaces.

What's on your worktable right now? Here's mine:

I'm working the copics at the moment. Getting lots done and learning as I go. Of all my tools and supplies I think copics are the one thing that I am always learning more about. Every time I get them out to play (more & more these days!) I learn something new. The more ya use 'em the more fun they are!


Stay tuned to see what I make with all this copicy goodness!

Thursday, March 24, 2011

paper.

Really, have you ever seen such pretty colors? Doesn't it just make you want to go make something? Actually...I think I need to go and do just that! But hey, if you are in need of some b-e-a-u-tiful paper let me know. I can hook you up! :)

What are you making today?

Saturday, February 19, 2011

...quotes

I'm not sure where I read this, but I have to say I love it!

I need to learn more of the balance between thinking it over and over thinking. I need to put that full stop in between letting it go and letting it bother me. Between working and over working. Between wanting it right and setting ridiculous standards.

Balance is a good thing.

Monday, February 14, 2011

hoppy little froggies!

This is a little valentine I made as I was experimenting with pop-ups.

Gotta love an easy-peasey accordian folded center to make poppin' up super fast.
I love the cheerfulness of this little card.
Happy Valentine's Day!
Posted by Picasa

Saturday, February 5, 2011

...finding inspiration anywhere & everywhere.

So there I was, going through the mail and THWACK I was hit by inspiration. My Muse must have been getting bored with all of the housework and directed me straight toward a divine moment of craftiness. So here's what the Muses sent me in the mail:I love this catalog! Inspiration on every page. It makes me want to create things, and shop. I resisted ordering anything (for the moment) and instead got myself busy creating, not wanting to waste a moment of divine inspiration.

So here's what came of it:
My goal was to balance the concentrated bling with some blank space and simplicity. I started with the pink paper and then made the "bling." I painted a piece of paper until I was happy with the color and got the gold and shimmer that I was looking for. And then I added the twinkle stickers. I stamped the sentiment and then punched that out and inked the edges. I decided it needed just a little bit more. The ribbon that I had didn't work at all so I just colored it until I liked the look of it. Pop it all together and this is what I got. So glad I made the time to craft when inspiration thwacked me in the head!

Where do you find inspiration? What inspires you? What do you create when inspired?


Supplies: Stamps- A Muse Artstamps; Paper- naturals ivory cardstock Stampin'Up, pink Paris & Co. by My Mind's Eye; Ink- rich cocoa Memento; Paint- LuminArte twinkling H2Os in pink crocus & autumn butternut; Bling- twinkle stickers A Muse Artstamps; 1/4" pink satin ribbon; Marker- E57 Copic.

Friday, February 4, 2011

One Little Word Project

Just came across this quote for my project:

"All you need to do is hold on tight...and believe." -Stephen King

This is so how I've been feeling lately. Lots of things going on and sometimes it's all you can do to just hold on and believe.

Check out Ali Edwards' blog- www.aliedwards.com/blog/one-little-word
Or join the class at www.bigpictureclasses.com and look up Ali's class One Little Word.

Saturday, January 29, 2011

...Valentine's Day

I did a lot of baking over the holidays and had some empty spice jars. As I was about to toss them into the recycling bin a little thought popped into my head. These would make cute little spice jars for a play kitchen. And here they are all dressed up in some Valentine-y cuteness. They will make a perfect gift for some special little girls in my life, AND all I used were some scraps a touch of glue and one tiny twinkle sticker! Gotta love saving money and using up scraps while making something super cute! Now all I need is to get my hands on some more spice jars!

Saturday, January 22, 2011

...finished projects!

Wow! It feels good to finish a project, especially when it is one that I have been working on for a few years.I designed this rug for a class I was taking at Green Mountain Hooked Rug School with one of my favorite teachers, Jule Marie Smith. The class was a study of early primitive rug styles with an emphasis on making that style your own.I loved playing with the crazy hit-or-miss boarder which is a common technique of old rugs. It was a great way to use up scraps. I learned a lot about color and movement as I worked. Hit-or-miss isn't quite so willy-nilly as it may seem. There is a lot of careful planning that goes into it to make it look the way it does. I purposefully hooked a few quirks in here and there because that is something that I like so much about the old rugs.


This little house is a favorite of mine. Simple. Wobbly. Primitive. Colorful. This is my kind of house. I would love to live in such a sweet little place. It makes me happy just to look at it. I also really love the background. I had fun dyeing lots of light value yellows to mix together. Swirling them all gives a tone on tone movement that is a favorite of mine.

I love to design rugs and dye wool and hook! And, boy oh boy, do I love a finished project.
It's so freeing...
I wonder what I should start working on next...


www.greenmountainhoodrugs.com/school